あけましておめでとうございます。 今年もよろしくお願いします。
fj.comp.dev.misc に昨年12月26日に投稿された記事
「USB赤外線リモコン on Mac OS X」で、
河野真治 @ 琉球大学情報工学 さん曰く:
パソコン用学習リモコン PC-OP-RS1
昔は、Crossam 2+ と、そのUSB version があったんだけど、 ちょっと高い。もう売ってないし。 これは、5,000円切っている。 もちろん、ドライバはWindows しかありませんが、 シリアルドライバなんて、なんとでもなる。libusb使ってもいいし。
鎌倉にお参りした帰り、たまたま立ち寄った ラゾーナ川崎 のビックカメラにて、 上記 PC-OP-RS1 を見つけたので衝動買い。
「BUFFALOの学習リモコンPC-OP-RS1をLinux(fc3)で使う」を参考にしながら、 perl でテストプログラムを書いてみる。 PC-OP-RS1 は普通のシリアルデバイスとして Linux から見えるので、 CPAN の Device::SerialPort を使えば簡単にコントロールできる。 赤外線リモコンの信号を受信するには、
--> 0x72
<-- 0x59
(リモコン受信)
<-- 0x53
<-- リモコンデータ * 240Byte
<-- 0x45
とするだけ。 そして、受信した 240バイトのデータ(固定長)を、
--> 0x74
<-- 0x59
--> 0x31 ※ 1ch=0x31,2ch=0x32,3ch=0x33,4ch=0x34
<-- 0x59
--> リモコンデータ * 240Byte
<-- 0x45
などと PC-OP-RS1 へ送ってやれば、
PC-OP-RS1 から赤外線が発射される。
ビデオの赤外線受信部近くに、PC-OP-RS1 ↓ の送信部を設置した
(両面テープでラックに固定)。
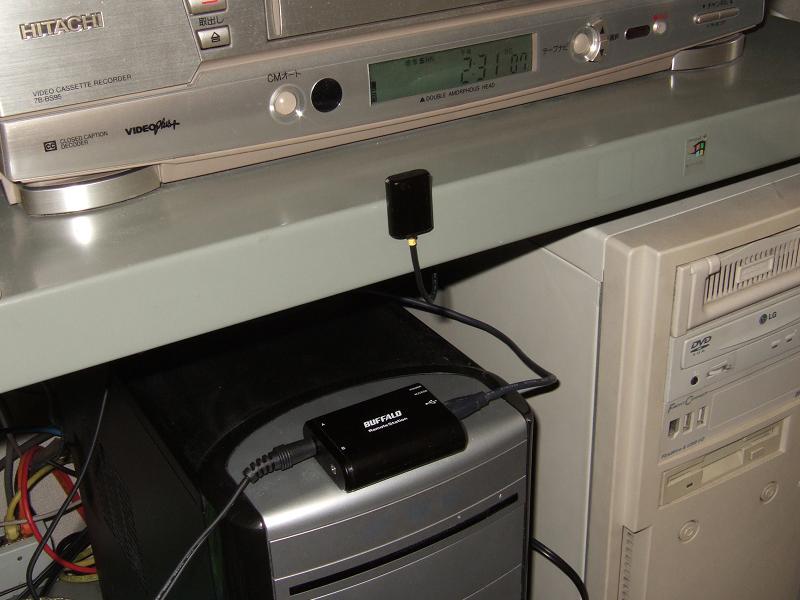
ラック下段にある PC の上の黒い箱状の ↑ モノが PC-OP-RS1 本体 (拡大写真)。
即席で作った perl スクリプト「irrc」(後述) を、 次のように「-r」オプション付で実行しておいて、 PC-OP-RS1 の受光部へ赤外線リモコンを向けてリモコンのボタンを押す。
% irrc -r
ffffffff0f00000080ff000000fc030000f01fc07f000000fe01fc070000e03f000000ff01fe030000f01f000080ff00fe010000f80fe03f000000ff000000fc07f01fc03f000000ff01fc07f80fe03f807f00ff01fc03f80f0000c07f00ff00fe03f80fe01fc07f00ffffffff07000000c03f000000ff010000f80fe01f000000ff00fe030000f01f0000807f00ff010000f80f0000c03f80ff000000fc07f00f0000c07f000000fe03f807f01f000080ff00fe01fc07f00fe03f80ff00fe01fc070000e03f807f00ff01fc03f80fe03f80ffffffff01000000f01f0000000000000000000000000000000000feffff
すると、このように 240 バイトのデータが 16進数で表示される。 このデータを irrc スクリプトの先頭部分で、
$Ir{'aPower'} = [
    pack("H*", "ffffffff ... 中略 .... 00feffff"),
    ];
などと定義する(ちなみに上記データは私の自宅のエアコンの電源ON/OFF)。 複数のボタンのシーケンスを定義する場合は、
$Ir{'AB'} = [
    pack("H*", "ボタンA を押したときの送信データ"),
    pack("H*", "ボタンB を押したときの送信データ"),
    ];
などと定義すればよい。 ここで定義したシーケンス名 (上記「aPower」や「AB」) を、 irrc スクリプトの引数として渡せば、 PC-OP-RS1 から赤外線が発射される。
以下、irrc スクリプト全体:
#!/usr/bin/perl
use strict;
use warnings;
use Device::SerialPort;
use Getopt::Std;

my %Ir;
$Ir{'vPower'} = [
    pack("H*", "ffffffffffffffffffffff0700000000007ef0831ff8c00f7e00003f00800ffc00003f00801f00c00700f00300f8c10f7c00003f00801f00e00700f0831f00c00f7ee0033ff8c10ffc00003ff00100fc00007e00001f00000000000000000000000000000000000000000000000000000000000000000000000000000000000000000000000000000000000000000000000000000000000000000000000000000000000000000000000000000000000000000000000000000000000000000000000000000000000000000000000000000000000000000000000000000000000000000000000000000000000000000000"),
    ];
$Ir{'aPower'} = [
    pack("H*", "ffffffff0f00000080ff000000fc030000f01fc07f000000fe01fc070000e03f000000ff01fe030000f01f000080ff00fe010000f80fe03f000000ff000000fc07f01fc03f000000ff01fc07f80fe03f807f00ff01fc03f80f0000c07f00ff00fe03f80fe01fc07f00ffffffff07000000c03f000000ff010000f80fe01f000000ff00fe030000f01f0000807f00ff010000f80f0000c03f80ff000000fc07f00f0000c07f000000fe03f807f01f000080ff00fe01fc07f00fe03f80ff00fe01fc070000e03f807f00ff01fc03f80fe03f80ffffffff01000000f01f0000000000000000000000000000000000feffff"),
    ];

our ($opt_v, $opt_r, $opt_d, $opt_c);
getopts("vrd:c:") || &help;
my $Verbose = $opt_v;
my $device;
if ($opt_d) {
    $device = $opt_d;
} else {
    $device = "/dev/ttyUSB0";
}
my $ch = 1;
if ($opt_c && $opt_c =~ /^[1-4]$/) {
    $ch = ord($opt_c) - ord('0');
    print STDERR "Ch: $ch\n" if $Verbose;
}
my $port = &openDev;
&sendData($port, "69");                # LED command
&expect("4f", &readData($port, 1));
if ($opt_r) {
    my $data = &receive($port);
    print unpack("H*", $data), "\n";
}
while ($_ = shift @ARGV) {
    if (defined $Ir{$_}) {
        print STDERR "Tx: $_\n" if $Verbose;
        for my $ir (@{$Ir{$_}}) {
            &transmit($port, $ch, $ir);
        }
    } else {
        print STDERR "Unknown command: $_\n";
    }
}
exit 0;

sub openDev {
    my $port = new Device::SerialPort($device) || die;
    $port->user_msg(1);
    $port->error_msg(1);
    $port->baudrate(115200);
    $port->databits(8);
    $port->parity("none");
    $port->stopbits(1);
    $port->handshake("none");
    $port->read_const_time(100); # 0.1 sec
    $port->read_char_time(5);
    $port;
}

sub transmit {
    my ($port, $ch, $data) = @_;
    &sendData($port, "74");                # transmit
    &expect("59", &readData($port, 1));
    &sendData($port, sprintf("3%d", $ch % 10));
    &expect("59", &readData($port, 1));
    $port->write($data) || die;
    &expect("45", &readData($port, 1));
}

sub receive {
    my ($port) = @_;
    &sendData($port, "72");                # receive
    &expect("59", &readData($port, 1));
    &expect("53", &readData($port, 1, -1));
    my $data = &readData($port, 240);
    &expect("45", &readData($port, 1));
    $data;
}

sub sendData {
    my ($port, $str) = @_;
    $port->write(pack("H*", $str)) || die;
}

sub readData {
    my ($port, $len, $timeout) = @_;
    my $i = 0;
    my $j = 0;
    my $data;
    if (! defined $timeout) {
        $timeout = 10;
    }
    while ($i < $len) {
        my ($l, $d) = $port->read(1);
        if ($l > 0) {
            $data .= $d;
            $i += $l;
            $j = 0;
        } else {
            $j++;
            if ($timeout > 0 && $j > $timeout) {
                print STDERR "TIMEOUT to read $len byte\n";
                exit 1;
            }
        }
    }
    if ($Verbose) {
        print STDERR "read: ", unpack("H*", $data), "\n";
    }
    $data;
}

sub expect {
    my ($ex, $d) = @_;
    my $str = unpack("H*", $d);
    if ($str ne $ex) {
        print STDERR "expect $ex, but got $str\n";
        exit 1;
    }
}

sub help {
    print STDERR <<EOF;
Usage: psoprs1.pl [opt] <com>...
opt:   -d <dev>   set device
       -c <ch>    set channel
       -r         receive
       -v         verbose
EOF
    print "com: ", join(" ", sort keys %Ir), "\n";
    exit 1;
}
「irrc vPower」を実行すれば、ビデオの電源を ON/OFF し、 「irrc -c 2 aPower」を実行すれば、エアコンの電源を ON/OFF できる。 もちろんエアコンの電源を Linux から ON/OFF できてもあまり嬉しくないが、 CS/BS 放送や CATV のチューナのチャンネルを Linux から切り替えて、 そのチューナの出力を Linux マシンで予約録画できると便利。
こんにちは、スクリプト修正して使用させていただきました。
ありがとうございました。
Comment by gixxer — 2008年1月17日 @ 15:06
たいへん参考になりました。
FreeBSD 8.3-RELEASE-p5 でスクリプトを一部修正して使用させていただきます。
FreeBSD では USBデバイス指定が /dev/ttyU* となります。またパーミッションを変更しないと、一般ユーザでは使用できないので注意が必要です。
Comment by runrun — 2013年1月5日 @ 00:14